Description of the club index
Welcome to the Goddard Sailing Association. The association owns 3 boats: Wavelength, a 19' centerboard flying Scot; See Breeze, also a flying Scot; and a 27' cabin cruiser named Take Luck.
The flying scots are kept on a trailer and the cruiser in a slip at Selby Bay Sailing Center off the South River, south of Annapolis. Members may charter these boats at the lowest rates on the bay.
The club also offers instruction at several levels, opportunities to socialize and sail with other club members, and opportunities to race in the Scots.
Membership index
GSA follows the GEWA rules for membership. Briefly, any present or retired civil servant, contractor, and immediate family of the above can be members.
In addition up to 10 people can be associate members, if they are approved by the Executive Committee.
Detailed information on how to join is posted here.
Activities index
In addition to classes, the club sponsors day-long sails to destinations such as Galesville, Annapolis, and the Eastern Shore.
There are evening sails where both beginners and salty helmsmen enjoy a sunset on the bay and an occasional astronomy lesson a bit later. We have periodic (sometimes spontaneous) happy hours, lunches, and dinner parties.
Contact the Rear Commodore (or anybody in the club) for tips about what activities you might enjoy.
History index
The Goddard Sailing Association began in 1973 with the purchase of the Flying Scot (Hull #402, manufactured in 1963), docked on Back Creek in Annapolis.
Later the boat was docked on Oyster Creek within sight of Thomas Point Lighthouse. In 1983, the Scot was moved to Harness Creek and the club purchased a 1974 Coronado 23' cruiser.
In 1990, these two boats were moved to the present club location on Selby Bay and a second Flying Scot (Hull #3730, manufactured in 1982) was purchased. The Coronado was retired in 1993 and replaced with the 26' Windrose.
In 1997, the Flying Scot Starwisp was replaced with a new Flying Scot named Wavelength.
In 2007, the Windrose was replaced by First light, a newer (1986) cruiser of the same type (Laguna 26).
In 2015, First Light was replaced a newer cruiser named Take Luck (a Hunter 27).
Organization and participation index
The Executive Committee meets as announced to discuss club business. All members are invited to attend. In addition, various committees are formed and always need help. To volunteer, call the Commodore.
The entire club has a Spring Meeting in March and a Fall Meeting and Elections in January. Members should stay informed by reading our web pages, calendar, and Email announcements.
The list of current officers and volunteers can be found
here.
How to get started in the club index
For beginners, the Basic Sailing Course is recommended. For experienced sailors a sailing resume should be made available, then call the Commodore to arrange for a qualification test on the boat of your choice.
Instructional program index
BASIC SAILING CLASS
This class teaches beginners how to sail. All club members in good standing are eligible for taking the class. The class fee of $110 includes 4 lectures, 4 boat lessons, and the qualification test on the Flying Scot.
There are typically two class sessions offered during the season.
Classes are announced in Dateline and are posted here.
ADVANCED SAILING CLASS
This class teaches club members how to sail the club cruiser. Prerequisites: Membership in good standing for at least one year, Flying Scot qualification, at least five successful (no accident) Flying Scot charters, participation in at least one working party or some other contribution to the club. By law, persons born after July 1, 1972 must have a Maryland safe boating certificate. The class fee of $75 includes 4 lectures and some boat lessons, and the qualification test on the cruiser.
Classes are announced to the membership by email and are posted here.
SATURDAY MORNING OPEN SAIL
The club will attempt to provide sailing opportunities with experienced skippers on Saturdays or other times for those who wish to build confidence in their sailing abilities. There will be club Email announcements with further information.
EVENING SAILS
The club offers evening/night sailing outings that are both instructional and recreational. These sails take place on the cruiser starting from mid-May through September,mostly on Friday evenings. All members are welcome.
Announcements are posted to the club Email list.
Flying Scot racing index
For information about racing opportunities, contact the Racing Coordinator. There are four types of events a racer might want to participate in: NIH CASUAL RACING, designed for helmsmen with little or no racing experience.
The races will be held on a weekly basis, but the day has not yet been decided. Selby Bay Sailing Center [SBSC] WEDNESDAY NIGHT RACING, races begin at 6 p.m. in the mouth of Selby Bay from May into September.
Charter a boat, get a crew, and show up before 5 p.m. NIH INTRAMURAL REGATTAS, once a month for racers with some experience. Call the Racing Coordinator at least a month in advance. WEST RIVER CLUB REGATTAS, for a year for experienced racers.
Ratings index
FLYING SCOT HELMSMEN
| To qualify |
Either six classroom lessons, a brief written exam, and three-four water lessons, or equivalent experience
Test by a qualifier |
| Restrictions | Can sail a Flying Scot during the day in area 3.
New graduates for with no other experience are required to stay in area 1 for 2 charters, then in area 2 for another 3 charters. |
CRUISER HELMSMEN
| To qualify | Three lessons or equivalent experience
Test by a qualifier |
| Restrictions | Can sail the cruiser during the day in area 3.
Those newly qualified on this boat with no other experience are required to stay in area 1 for 2 charters, then in area 2 for another 3 charters.
By law, persons born after July 1, 1972 must have a Maryland safe boating certificate to legally operate a power vessel (First Light under power) in Maryland waters.
One can take the class and the exam online, or at one of the frequently taught classes in the area. The fee for the online exam is $15.00.
More information is available at : http://www.boat-ed.com/md/md_internet.htm |
ADVANCED CRUISER HELMSMEN
| To qualify |
Cruiser helmsman rating
7 Cruiser charters as helmsman
4 night lessons on cruiser
Passing a practical test by Qualifier |
| Restrictions |
Can sail the cruiser day or night in area 4. |
QUALIFIER
| To qualify | Appointment by executive committee.
Water instructors are awarded sailing credits; the current rate is $5 credit per student per lesson. This credit is available throughout
the year but cannot be carried over to the next year and cannot be used for buying salty dogs. |
DEFINITIONS OF SAILING AREAS
| Area 1 | South River |
| Area 2 |
North to Bellbuoy 77, East to shipping channel, South to Bellbuoy 73 |
| Area 3 |
All of the northern Chesapeake and its tributaries, south to Solomons Island |
| Area 4 |
The Chesapeake and its tributaries |
Charters index
POINTS OF CONTACT
| Charter rep. | Robin Clemente |
Office phone: 301-614-5034 |
| Alt. charter rep. |
Vacant | |
ELIGIBILITY
To be eligible to charter, you must be a GSA member in good standing and owe no fees from prior charters. Also, you must be qualified to sail the boat you are requesting.
SCHEDULING
Scheduling is now being done through the web site at http://www.AircraftClubs.com.
FEES
Current rates for all charters are listed at the page on fee information. Morning charters run from sun-up to 2:00 pm. Afternoon charters run from 2:00 pm to sun-down.
Government holidays count as weekends.
You can also purchase a "Salty Dog Package" of $150 in charter credits for $100, paid in advance of sailing.
All charter fees are non-refundable and due one week after you schedule the charter. Pay the club treasurer with a check made out to the Goddard Sailing Association.
Please indicate the charter date, time (a.m. or p.m.), and boat on the check (or for a Salty Dog, if appropriate).
Excess payments (charter fees paid by a member but not used before the end of the sailing season) will be carried over to the next season.
In the next season, any cash balance carried forward can be used by the member toward any type of payment due to the club.
SALTY DOG BONUS
Pre-pay $100 toward future charters to receive $150 of charter credits. The club encourages this for any member who anticipates doing a reasonable amount of sailing in the club.
This generous bonus is a good deal for club members, and is offered because it reduces the number of charter fee payment checks that the club must handle,
and because having an existing credit balance encourages people to sail more (which is why we have a sailing club in the first place). If a member has any unused Salty Dog balance remaining at the end of the sailing season,
a pro-rated cash amount is carried over for the next season. Example: a member purchases a Salty Dog ($100 cash + $50 bonus), and uses up $90 of it for charter fees, leaving an unused balance of $60 at the end of the season.
The pro-rated cash balance carried over to the next season would be $40, because the total Salty Dog credit is 2/3 cash and 1/3 bonus.
CREDIT
Chartering credits may be used in place of cash for the purposes of chartering GSA boats. With your annual dues, you will be awarded a $50 chartering credit.
GSA officers and standing volunteers receive an additional $20 chartering credit.
Instructors receive a $5 charter credit per student per water lesson. These credits are applied to charter fees before other types of payments are used. You cannot use chartering credits accrued from previous years,
and credits cannot be applied toward the cost of the membership fee or a Salty Dog.
RESCHEDULING
You may reschedule a charter by notifying the Charter Representative at least three business days before a sail date. For example, call the Charter Representative on or before Tuesday to reschedule a Sunday sail.
You may also reschedule a charter canceled due to bad weather, including the complete lack of wind. You must cancel a charter if winds are forecast or observed in excess of 20 knots, or if a small craft advisory,
thunderstorm warning or tornado warning is issued for the area.
Please call or email the Charter Representative the first business day after a weather cancellation even if you have not yet selected a reschedule date.
Etiquette near slips index
Do not drive a car onto the pier. You will be held responsible for damage you cause to other boats or the structures or facilities of the Selby Bay Sailing Center.
Any conduct that interferes with the pleasure of neighbors or other tenants is unacceptable. Excessive profanity or intoxication on the part of you or any of your guests is unacceptable.
Charcoal fires are only permitted in the picnic area, subject to posted rules. Excessive speed on the roads leading into Selby Bay will not be tolerated. Observe posted rules.
Late returns index
The charter skipper is responsible for returning the boat to the dock before the end of the charter period. Late return of less than one hour requires a penalty of $10, payable to the waiting club member.
Return in excess of one hour makes the late charter skipper liable for the full charter fee, also payable to the disappointed charterer.
Map of the water near Selby Bay index
Free downloadable nautical charts and other information about nearby areas can be found at the pages on
Daysail destinations and
Sailing links.
Safety index
- Ensure boat and all equipment is in good shape before shoving off.
- Always wear a life preserver or other Personal Floatation Device (PFD). Keep a throwable cushion in the cockpit.
- Always use a turtle buster on the Flying Scots.
- Always check the weather forecast by phone, computer, or weather radio.
- If you think you’ll need a reef, rig it before leaving the dock: It’s easier to put in at the dockside,
wind is stronger outside the shelter of the marina, and if you think you need it, you need it.
- At least 2 people per boat; 3 for newly qualified, inexperienced sailors.
- Always discuss with partners the sailing plan and ensure everyone knows what they are to do in a given situation.
- In case of thunderstorms, head to nearest shore, drop sails and anchor.
- Use common sense - don't sail beyond your abilities!
USE OF CLUB BOATS IS BY THE FOLLOWING DISCLAIMER. A CHECKOUT SHEET WITH THE DISCLAIMER MUST BE SIGNED FOR EACH CHARTER. THIS IS THE TEXT OF THE GSA LIABILITY RELEASE FORM:
I hereby acknowledge and agree that the decision to sail is at all times my sole responsibility, and I assume full responsibility for any and all actions I take and decisions I make while sailing.
Whether or not I charter a boat from the GSA, I hereby release the GSA from any and all liability and agree that neither the GSA nor any of its officers, directors,
and/or members shall be liable to me or to any other party for any act, occurrence, or failure to act in connection with my sailing, including but not limited to: the decision to sail at any time;
the evaluation of weather conditions; the condition of any boat in which I sail and equipment used in connection with the boat; the decision of where to sail;
and any injury or damage to any person or property in or out of any boat.
I also hereby acknowledge and agree that I take full responsibility and assume all liability for any injuries to myself and my party while on or around the boats, slip, dock area, parking area,
and all property owned by the owner of the slips. I understand I am responsible for damage or loss of club equipment that I am using, or expenses incurred, up to the insurance deductible limit.
ACCIDENTS
If the boat is involved in an accident while you were chartering it: (1) See that all passengers get to shore safely; (2) if you cannot return the boat to the docks, beach it or anchor it; (3) contact any member of the executive committee.
Flying Scot: Leaving index
CHECK EQUIPMENT
- You can orient yourself by standing on the base of the pier facing the water. Our Scot Wavelength is the first boat on the left side of the pier. You can see a white shed and a blue shed to your right;
behind them is the green bathroom. The NASA locker is the left half of the blue shed.
- Get checklist from locker. Printable checklist.
- Remove boat cover, fold, and put in rear of the boat or in the locker.
- Use the checklist from the locker to check required equipment and the next group of items. As you rig the boat, check off the remaining items in the third group on the checklist.
- Don lifejackets.
MOVE BOAT TO END OF DOCK
- Raise rudder if it is down. Attach a painter (line) to the bowplate.
- Unclip the docking lines from the boat and remember where they clip onto the boat. Do not untie the other ends of the docking lines.
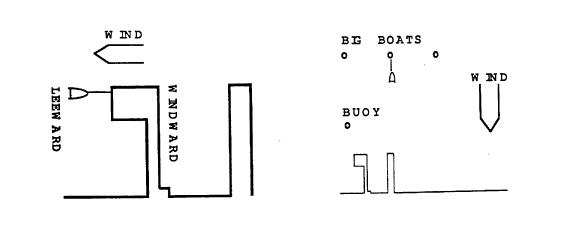
- Paddle, pole, or pull your way with ropes to the end of the pier. Tie the painter to a post with a clove hitch. It is VERY IMPORTANT that the boat be downwind of this post in open water,
so the boat is not banging against anything (even if the wind is light). In other words, the boat is on the leeward side of the pier. If the wind is from the direction of the South River and strong
and you are concerned about having enough water to turn in, tie up at one of the posts where the big boats are docked. Do not attempt to sail out of the slip or to raise the sails in the middle of the water.
RAISE SAILS
- Take the jib out of its bag.
- Attach the jib halyard to the head of the jib.
- Attach the jib tack wire to the tack of the jib.
- Attach the jib to the jibstay with snaps.
- Feed the jib sheets between the mast and sidestay, through the fairlead, and through the cleat on the centerboard trunk. Tie a figure eight knot or stopper knot at the end of the jib sheet.
Incidentally, the jib sheets should have a knot 10" behind the clew.
- Loosen the boomvang and Cunningham.
- If needed, reef the mainsail.
- Slide the turtle buster over the head of the mainsail.
- Detach the main halyard from the ring on the forward side of the mast and attach it to the head of the mainsail, looking up the mast to see that the main halyard runs freely to the top of the mast.
Disengage the lock on the lower winch. Pull the head down until the lower winch shows bare metal (in other words, the halyard is completely unwrapped from the winch).
- Insert the winch crank on the starboard side of the lower winch.
- Maintaining light tension on the main halyard by pulling lightly down on the mainsail's luff, crank the winch and feed the boltrope of the mainsail into the slot to raise the mainsail.
Raise the mainsail until the shackle is 2 inches below the sheave on top of the mast. Engage the lock on the winch. If you raise the sail above this point you may damage the sheave.
You never need to exert significant force on the winch crank. If you find yourself forcing the crank, look up the mast and determine what the problem is instead of muscling the crank.
The boltrope may be bunched in the slot or the halyard may be wrapped. If you break a winch crank, you were exerting at least 3 times the force you should ever need.
- Disengage the lock on the upper winch. Grab the jib halyard shackle and pull down until the upper winch shows bare metal.
- While maintaining light tension by pulling lightly down on the luff of the jib, crank the upper winch until the jib is raised. Engage the lock on the upper winch.
(The purpose of starting the halyard at bare metal and maintaining light tension is to prevent the halyard from jamming or kinking, which it does when loose on the winch.)
TAKE-OFF
- Plan your take-off to avoid jibes near the pier. Discuss with crew.
- Untie the tiller and push the rudder down.
- Lower the centerboard. (This should be the last thing you do at the mooring because the centerboard causes the boat to start sailing.)
- Detach the painter from the bowplate, pull the boat up to the post, and untie the painter from the post but hold on to the post with your hand or the painter.
- When the skipper says so and not before, let go of the post
- Turn the boat away from the shore by pushing the post toward the shore, backwinding the jib toward the shore, pointing the tiller away from the shore (if you are moving backwards),
or pointing the tiller toward the shore (if you are moving forwards).
- Stay to seaward of the double post as you sail out.
Flying Scot: Returning index
LAND ON LEEWARD SIDE OF PIER
- Plan your landing and discuss it with your crew. Make sure everyone knows who will do what when.
- Tie the painter to the bowplate.
- Stay seaward of the double post.
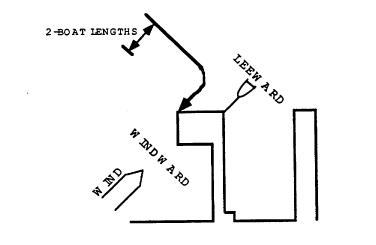
- Sail to a point 2 boat lengths downwind of the post on the pier, turn up into irons, drift to a stop with the bow at the post, and tie the painter onto the post. Make sure you land on the leeward side of the pier.
See Figure. Land softly so you don't damage the boat or pier. If you aim at the end of the pier as in the Figure, you can easily turn aside at the last minute if you are moving too fast.
The Figure shows one approach: come in on a beam reach two boat lengths (more in light wind) downwind of the pier, when directly downwind, turn into irons and drift to a stop.
A second approach is to come in SLOWLY on a close reach, trimming sails to gain speed, luffing sails to slow down, and turn into irons half a boat length from the pier. Tie the painter to a post with a clove hitch.
- Raise the centerboard.
DROP SAILS
- Crank the upper winch a tiny bit, enough to release the lock.
- Remove the crank from the winch.
- Let the jibsail fall into the boat. If the jibsail doesn't fall, pull it down by the luff. (Do not operate the crank in reverse; that will tangle the halyard on the winch.)
- Repeat for the mainsail.
- Tie the tiller.
MOVE BOAT TO SLIP
- Paddle, pole, or pull your way with ropes into the slip, bow toward the pier. We are in the slip closest to shore.
- Clip the docking lines onto the boat. The bow lines clip onto the bowplate. The stern lines clip onto the rings on the transom (the vertical back of the boat), not the eye straps on the deck.
The docking lines have been cut to the correct length; do not adjust them.
TIDY UP
- Remove the main halyard from the head of the mainsail and attach to the ring on the forward side of the mast. Pull the halyard until bare metal shows on the lower winch.
Maintaining light tension on the halyard, crank the winch until the halyard is snug.
- Fanfold the mainsail on the boom and secure with the sail ties you find in the jib bag. Keep light tension on the leech as you fold the sail. Make sure the battens are parallel to the boom as you fold the mainsail.
Do not crumple or roll the sail after folding it -- loose is good; neat may destroy the fibers by introducing sharp folds.
- Remove the jib halyard from the head of the jib and attach the jib halyard to the bowplate. Crank the upper winch until the mast is snug, i.e. cannot move fore and aft.
- Untie the figure eight or stopper knots from the ends of the jib sheets. Pull the jib sheets to the jib.
- Fold the jib on the boat or grass, but not on the pier or gravel. Be careful not to bend the battens. Put the folded jib in the jib bag and leave it on the boat
- Coil the centerboard pennant and rest it on the handle on the tabernacle.
- Take the slack out of the mainsheet and knot the mainsheet just beyond the block so the mainsheet prevents the boom from moving around too much. Coil the mainsheet and tie it so it hangs and dries.
- Leave the tiller extension attached to the tiller.
- Return lifejackets to their container in the rear of the boat
- Tie the boat cover to the eyestraps on the deck. Remember that red is port, green is starboard, and the dirty side is up.
- In our locker, return the completed checklist to the box. Complete the logbook entry with time in, wind and wave conditions, crew members and other stories.
Using the hoist index
CAUTION:
The following is a reminder for those who have already learned how to use the hoist. If you cannot make sense of it, ask one of the nice people who live in the blue house (Bob, Mary Ellen, or David Neff)
rather than risking injury or damage. If you learn that the procedure below is incorrect, contact a member of the Executive Committee immediately because either you or this procedure is wrong and someone is risking injury or damage.
EVERYTHING CAN BE DONE SINGLE-HANDED, BUT TWO PEOPLE WORKS BEST.
PREPARE BOAT FOR HOIST
- Position the golf cart in front of the trailer.
- Tilt the trailer from bow up to horizontal position.
- Attach the trailer to the hitch (ball) on the golf cart.
- Remove the boat cover.
- Tie a painter to the bowplate.
- Put the rudder in the UP position, and watch that it doesn't fall down.
- Put the plug in the transom drain hole (IMPORTANT!).
- Swing the hoist arm most the way toward land to avoid hitting the topping lift.
- Maneuver the trailer onto the metal grating under the hoist. Position the wheels of the trailer on the white marks on the grating. Now the stern should be facing the water and the bow facing the land.
AT THE HOIST
- Swing the hoist arm over the boom.
- The mainsheet and boomvang should be snug and cleated. The lifting bridle should be attached from the last sail. If it is not, you need to attach it.
First, attach the forward end of the cable by fitting the bolt through the hole in the tabernacle. Only thread the nut until the bolt pokes through the nut; you don't need to snug the nut against the tabernacle.
Second, pass the lifting bridle over the boom. Third, attach the aft end of the cable to the fitting on the aft end of the centerboard trunk; this fitting is halfway between the top of the trunk and the floor of the boat.
BE CAREFUL that you have attached the lifting bridle correctly.
- Quickly load gear into the boat from the step.
- Lead the hoist's hook through the ring in the middle of the lifting bridle.
- Press the button on the hand held control to take out most (BUT NOT ALL) of the slack from the chain.
- Adjust the lifting bridle to (1) make sure the bridle won't scrape the boom and (2) make sure the attachment at the centerboard trunk is centered, not hanging over the side (***clarify here***)
- Get out of the boat if you needed to be in it.
- Lift the hoist slowly until the cable is tight and the boat is beginning to be lifted.
- Remove the trailer winch line from the bow plate and make the painter reachable. Have someone hold it
- CAUTION: THE NEXT STEP WILL DAMAGE THE BOAT IF YOU HAVEN'T ATTACHED AND CHECKED THE BRIDLE PROPERLY.
- Lift the boat until clear of the trailer.
- Push the boat (preferably from the bow) toward the water and begin to turn it when over the water. The hoist arm will move to become perpendicular to the shoreline. That is the point where the boat is farthest from the platform.
The goal is to move the hoist arm perpendicular to the shoreline, not to spin the boat around the cable.
- While one person lowers the hoist, the other holds the painter in one hand and the near shroud in the other. Watch that the boat doesn't hit the platform on the way down. If it appears that the boat may hit the platform,
make sure the hoist arm is perpendicular to the shoreline rather than pushing the boat out, since the boat pushes back as hard as you push out.
- After the boat is floating on the water and the chain is slack, remove the hook and raise the hoist a few inches to clear the boom. Walk the boat to the side of the pier, watching that the rudder or tiller is not caught in a piling and the boat does not knock the pier. Use the golf cart to put the trailer back where it was.
- Detach the trailer from the golf cart
- Detach the lifting bridle and stow it in the boat's rear locker or on shore.
OUT OF THE WATER
- Land at the end of the pier. Drop the sails and make the boat ship shape. Make sure the centerboard is up, the rudder is up, the tiller is tied, and the mainsheet and boomvang are snug and cleated. Leave the painter tied to the bowplate.
- Attach the lifting bridle. First: attach the forward end of the cable by fitting the bolt through the hole in the tabernacle. Only thread the nut until the bolt pokes through the nut;
you don't need to snug the nut against the tabernacle. Second: pass the lifting bridle over the boom. Third: attach the aft end of the cable to the fitting on the aft end of the centerboard trunk;
this fitting is halfway between the top of the trunk and the floor of the boat BE CAREFUL that you have attached the lifting bridle correctly. Use the golf cart to move the trailer onto the grating as above.
- Move the boat along the pier with the painter and near shroud toward the hoist. Don't let the boat knock into the pier. Position the boat under the hoist with the bow toward the right as you are facing land.
- Move the hoist arm so it is perpendicular to the shoreline.
- Lead the hoist's hook through the ring in the middle of the lifting bridle.
- Press the button on the hand held control to take out most (BUT NOT ALL) of the slack from the chain. Adjust the lifting bridle to (1) make sure the bridle won't scrape the boom and
(2) make sure the attachment at the centerboard trunk is centered, not hanging over the side. Get out of the boat if you are in it.
- Lift the hoist slowly until the cable is tight and the boat is beginning to be lifted.
CAUTION: THE NEXT STEP WILL DAMAGE THE BOAT IF YOU HAVEN'T ATTACHED AND CHECKED THE BRIDLE PROPERLY.
- Lift the hoist SLOWLY until the cable is tight and the boat is beginning to be lifted by the hoist. While one person raises the hoist, the other holds the painter in one hand and the near shroud in the other. Watch that the boat doesn't hit the platform on the way up. If it appears that the boat may hit the platform, make sure the hoist arm is perpendicular to the shoreline rather than pushing the boat out, since the boat pushes back as hard as you push out.
- Pull the painter to move the boat and hoist arm so the boat is over the trailer.
- If the boat is not over the trailer, reposition the trailer instead of thinking that you will push the boat over into the trailer as it comes down. Slowly lower the boat onto the trailer.
- Reattach the trailer winch line and snug the boat against the bow cheek.
- Remove the hook from the lifting bridle ring and lift the hoist a few inches.
- Swing the hoist arm most of the way toward land to avoid hitting the topping lift in the next step.
- Use the golf cart to put the boat and trailer back in their place.
- Leave the lifting bridle attached for the next person.
Cruiser motor index
Cruiser electrical systems index
BATTERIES
There are two high quality marine batteries onboard. They are located under the cockpit, behind the steps going into the cabin. At the control panel (beside steps) the switch settings for red battery selection are:
[2] - - - [BOTH] - - - [1] - - - [Off]
It's important to use one battery at a time. It's suggested that you select the one with the lower charge level. Any motoring done that day will recharge it. The second battery (not in use) will be there as a backup to start the engine in case the initial battery loses all of its charge during the outing.
It's also important to leave the system [Off] at the dock. The electric bilge pump runs automatically, and is directly wired to Battery #1.
A charger unit is stowed below decks and can be used while docked (without oversight) to recharge any one battery. To begin recharge:
- Attach the red and black clamps of the charger to the appropriate poles of *one* battery, and stretch out the cord.
- At the slip, there is an orange extension cord and outlet (further around the pier, one slip over). Without connecting that cord to the outlet, pass it over the boat docked in the next slip (with plenty of slack) and into the First Light cabin.
- Plug the charger into the extension cord. Close the cabin door/cover as needed for stowage. The cord will pass through at the corner.
- Check for sufficient slack and extension cord path (to stay out of the water), and then make the electrical connection at the pier outlet.
Reverse this process to disconnect the charger (e.g., first unplug from pier outlet).
LIGHTS AND ELECTRICAL SWITCHES
The master electrical panel is located to the right of the chart table. Running lights are necessary for night sailing/motoring. The bow light switch controls the mast steaming light indicating the boat is motoring.. Turn these on (and verify that they are on) when conditions warrant, whether anchored or under sail. Dome and interior cabin lights are by the cabin light switch.
The red switch powers the shortwave radio. The radio always powers up on emergency Channel 16. It can be tuned to NOAA stations for marine weather reports. Weather reports from Dulles, BWI, and Andrews are repeated periodically, as well as any special storm alerts or small craft advisories.
All electrical panel toggle switches are left OFF when the boat is not is service. The master panel switch (push-in at top) can be left on.
DEPTH INDICATOR
One panel switch labeled 'Instruments' powers up the cockpit Instrument unit (please remember to cover it again after the sail is over). There is an instruction manual for the Instrument unit in the chart table. Normally depth is reported in feet with a zero level at the hull transducer about a foot below the water line. When the meter reads 2.8 feet you're likely aground.
Cruiser sails and rigging index
LINES
- Main halyard: along cabin top, to starboard side of cabin hatch
- Main sheet: mounted to traveler above main cabin
- Jib halyard :along cabin top, to port side of cabin hatch. Do not uncleat or adjust.
- Jib sheets: along port and starboard sides, through various fittings. Winch handle is stored in cabin and locks into place when inserted. Twist red pin to release.
- Jib furling line: thin line on port side
- Tiller line: holds tiller in place at dock, twist know to unlock during sail
- Anchor: with chain rode and line stored in bow locker
Cruiser procedures index
DOCK LINES
Fixed and measured lines are in place at the GSA slip. Note that the stern lines are crossed and attached through/around the rear cleats. The bow lines are not crossed. Note the spring line on the pier side that should be attached to the port winch to ensure that the boat doesn't move too far forward in the slip.
When leaving the slip, make sure that no lines are left in the water (both for propeller safety and access upon return).
LEAVING THE DOCK
The Laguna draws 3.5 feet of water. It's best not to leave or return to the GSA slip at extreme low tide, particularly when the Northern Bay waters have been pushed south by several days of strong northwest winds. The water around the Selby Bay Sailing center is quite shallow. Motor the boat in reverse directly back to deeper water. Keep the speed down and release the motor swivel pin in order to maneuver easily.
You'll find that the motor will often behave rather oddly at low speeds. Because of the propeller spin direction, the motor tends to pull the stern to port when in reverse. As you shift from reverse to forward, it can be difficult to bring the bow to port (turn left). With the motor mounted on the port transom, the boat prefers to turn clockwise at low forward speeds. Again, swiveling the motor --- throttle stalk aligned in parallel with tiller --- can help to avoid trouble in tight quarters.
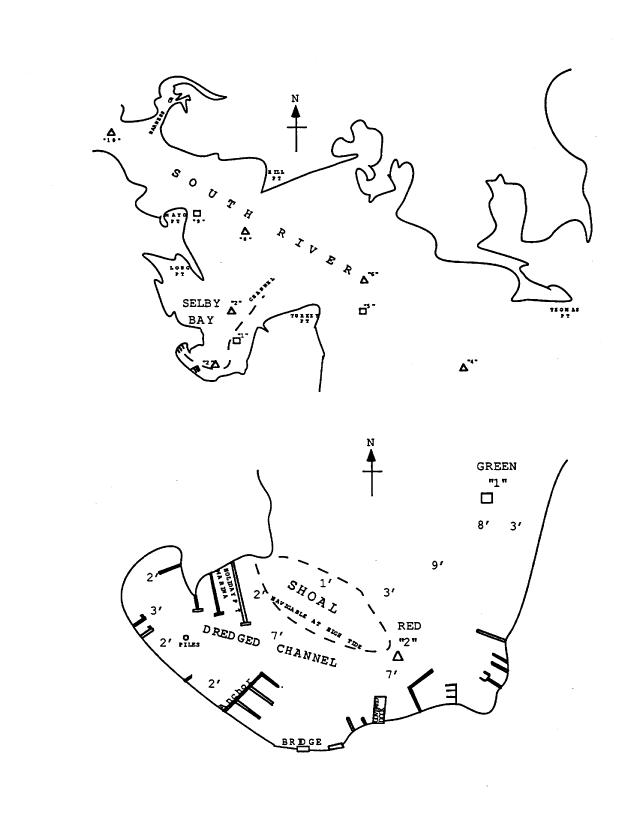
With the motor, back slowly out of the slip. Back directly away from our pier toward the Holiday Pt. Marina with its larger boats. As you approach the larger boats put the motor into forward and as the boat starts forward swing the bow around to the left (port) pointing out to Selby Bay. It will take a moment for the boat to get up forward speed so that the rudder will be useful. Keep the big boats close to your port side. When there are no more big boats on your left, keep going toward the red marker. Keep the red marker on your port side as you turn left and head down Selby Bay. See the map. Return following the same path and point the bow toward shore as you park the boat in our slip.
MIND THE MARKERS
As stated above, Take Luck needs deeper water than the Scots, and this requires cautious navigation and strict adherence to all channel markers. When leaving the slip, motor along our inlet as close to the marina pilings on the opposite side as reasonable. That side has been dredged to a depth of 5-6 feet. Head directly for the first red marker, avoiding the nearby shoreline. Thereafter, navigate according to all appropriate channel markers, and don't push your luck by sailing right up against them (trusting the bottom to have not shifted...).
Note the pairs of 'Float Free' channel marks that designate navigational channels having no crab pots; they look like white cylinders with orange/red bands. When leaving the South River at 'Red #2' there is one channel toward the Thomas Point Lighthouse and another toward the West River inlet. You can instead venture straight out into the Bay, but only if you remain on watch to avoid crab pot floats. They tend to hang up on the rudder or propeller, and they can cause damage as you stop suddenly.
Another navigational constraint is mast height. The Take Luck mast is approximately 45' above the waterline, so be careful which bridges you try to motor under. For example, when going up the South River, you can pass under the center span of the first large bridge (Route 2), but not the next (Riva Road) farther upriver. Another hazard for much larger boats is electric power lines that may cross over navigable waterways.
SAILING
The clips and stanchions of the life-lines are not recommended as back rests. They have been known to pop open under certain pressure and allow a less-than-graceful water entry for certain passengers.
index